

Microsoft announced the general availability (GA) of GitHub Action on November 13, 2019. GitHub Actions enables you to create Software Development Life Cycle (SDLC) workflows like continuous integration (CI) or continuous delivery (CD) . A workflow is defined by a YAML (.yml) file that is located inside the.github/workflows directory in your repository.
This article shows you how to connect a GitHub Action workflow to your Azure subscription using the Azure login (azure/login) action in order to manage your Azure resources using the Azure CLI or other GitHub Actions for Azure.
Depending on which GitHub Action for Azure you are using, there might be other authentication options available. For example, you can authenticate using publish profile credentials if you are using the Azure WebApp (azure/webapps-deploy) action.
Configure deployment credentials
The Azure login action uses a service principal to authenticate against Azure. We can create the service principal by using the az ad sp create-for-rbac command in the Azure CLI.
You can also create the service principal using the Azure portal (see How to: Use the portal to create an Azure AD application and service principal that can access resources).
Before we can run the az ad sp create-for-rbac command, we have to sign in the Azure CLI using the az login command:
az login
Now we can create the service principal and configure its access to Azure resources. The principal of a CI / CD workflow typically needs the built-in contributor right (can create and manage all types of Azure resources but can’t grant access to others) in order to deploy artifacts to certain Azure resources like an Azure Web App.
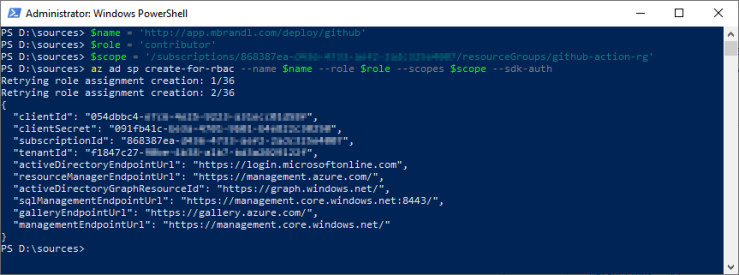
In the following example, I create a service principal that has contributor right for a specific resource group:
$name = 'http://[yourappname]'
$role = 'contributor'
$scope = '/subscriptions/[id]/resourceGroups/[rg]/'

az ad sp create-for-rbac --name $name --role $role --scopes $scope --sdk-auth
Note: It is always a good practice to grant minimum access and restrict the scope to a single resource or a resource group (least privilege principle).
This is how the output looks like:
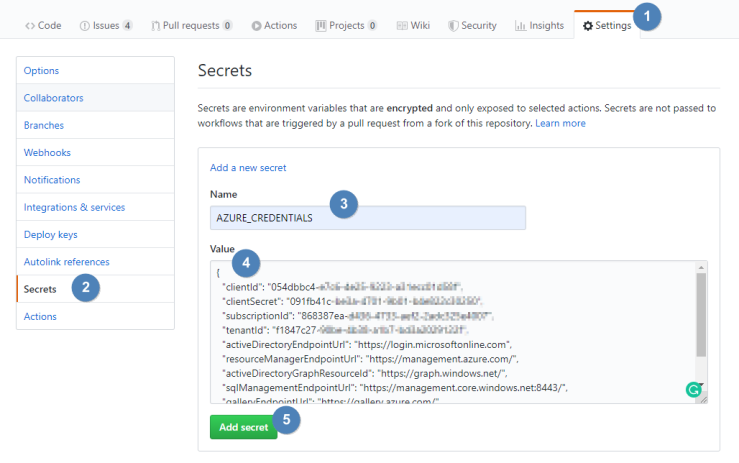
Now we have to copy the JSON output and store it as a GitHub secret within our repository.
Within your repository, click on Settings (1) and go to the Secrets (2) page. Enter a name for the secret e. g. AZURE_CREDENTIALS (3) and paste the previous JSON output inside the Value section (4). Then you add the secret by clicking the Add secret button (5):
Use the Azure login Action
We have set up the deployment credentials in the last step, now let’s create a GitHub Action workflow and login to Azure:
name: Azure Login sample workflow

on: [push]

jobs:
test-azure-login:
runs-on: ubuntu-latest
steps:

- uses: azure/login@v1
with:
creds: ${{ secrets.AZURE_CREDENTIALS }}

- run: |
az account show
The name of my workflow is azureLoginWorkflow.yml and it is located in the .github/workflows directory.
The first step within the workflow (line 10 – 12) uses the azure/login action to authenticate against Azure. The next step just runs az account show to demonstrate the login.
This is how a successful run looks like:

GitHub Action to trigger a run in Azure DevOps pipelines
While GitHub Actions makes it easy to build and deploy our code right from GitHub, it currently lacks some features like Environments or approval process that Azure DevOps Pipelines offers. Fortunately, we can trigger an Azure Pipeline run as part of our Action workflow using the azure/pipelines action. You can read more about it here.
You can find the demo workflow in my GitHub repository.
[…] Deploying to Azure using GitHub Actions via Martin Brandl […]