

Azure Active Directory (Azure AD) B2C is a popular business-to-consumer identity management service from Microsoft that enables you to customize and control how users sign up and sign in to your application.
While there are many examples out there how to use Azure B2C with an ASP.NET Core web application, it’s hard to find examples that performs identity management with Azure AD B2C using an Angular application.
In this article we will create an Angular 9 web application that authenticate against an Azure AD B2C and calls a secured ASP.NET Core-Web-API.
Prerequisites
Configure Azure AD B2C
For our example we need to create two applications. The first one will represent our middleware (ASP.NET Core-Web-API). The second one represents our web app (Angular).
Register the middleware application
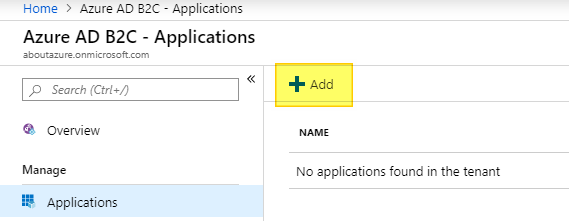
To register the middleware application, go to the Application blade within your Azure AD B2C and click on Add:
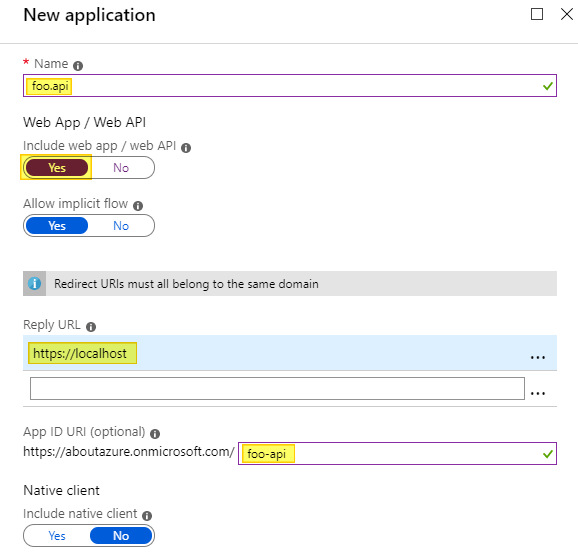
Enter a name that describes your middleware and turn the Include web app / web API switch to YES. We don’t need the Reply URL for our middleware since we will obtain the token with an angular application. However, we have to enter any valid URI here (I choosed https://localhost). Finally we need to specify the APP ID URI that we will use later to grant the web app access to the middleware:
Register the web application
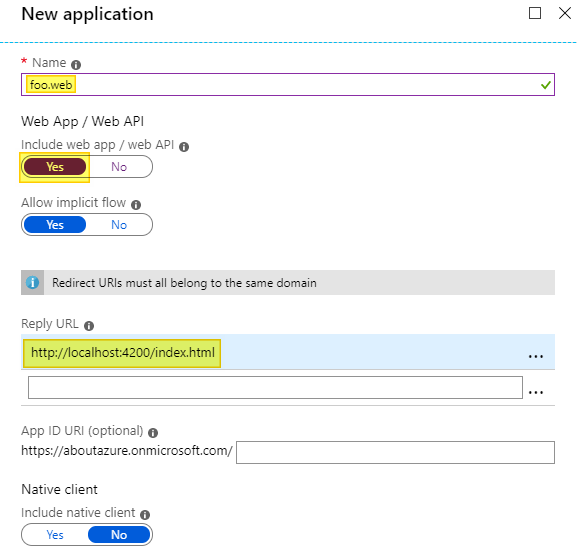
Now we have to register the web application. Again, enter a name that describes your web application and turn the Include web app / web API switch to YES. This time we do care about the reply URL. For local testing purpose we can enter http://localhost:4200/index.html here. We don’t need to specify an App ID URI. This is how the configuration should look like:
Grant API access
Since the web application needs to communicate with the secured middleware, we will also have to grant the web application access to the API.
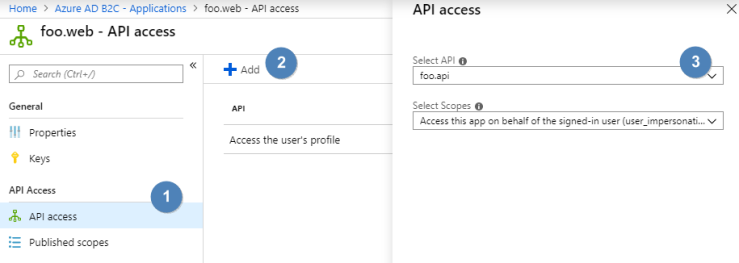
Go back to your Azure B2C web application registration and inside the API access blade, click on the Add button. On the new dialog select your previous created middleware application and click on the Ok button (leave the scopes as they are):
Create a sign up and sign in user flow
The last thing we have to configure inside the Azure AD B2C is the user flow. Learn more about user flow types.
Open the User flows (policies) blade and click on the New user flow button. In the following view click on Sign up and sign in.
Enter susi in the Name input and select Email signup for the Identity provider. Leave Multifactor authentication disabled and check both checkboxes for the given name claim:

Create and secure the middleware
We will scaffold our ASP.NET Core Web API middleware using the .NET Core CLI. The command we are looking for is dotnet new.
Using the following parameters, we can create the middleware with preconfigured Azure AD B2C authentication:
- –auth IndividualB2C (Individual authentication with Azure AD B2C)
- –aad-b2c-instance The Azure Active Directory B2C instance to connect to
- –susi-policy-id The sign-in and sign-up policy ID for the middleware we have created earlier
- –client-id The Application ID of the middleware
- –domain The domain for the directory tenant
- –name The name for the middleware
Here an example with the values for my setup:
dotnet new webapi `
--auth IndividualB2C `
--aad-b2c-instance https://aboutazure.b2clogin.com/ `
--susi-policy-id B2C_1_susi `
--client-id 1d1cfeca-1fb2-4bf8-9d6b-4d5ac15ad7b3 `
--domain aboutazure.onmicrosoft.com `
--name foo.api
Before we run the application, lets change the ValuesController.cs to return “Hello World”:
using Microsoft.AspNetCore.Authorization;
using Microsoft.AspNetCore.Mvc;

namespace foo.api.Controllers
{
    [Authorize]
    [Route("api/[controller]")]
    [ApiController]
    public class ValuesController : ControllerBase
    {
        // GET api/values
        [HttpGet]
        public IActionResult GetAsync() => Ok("Hello, World!");
    }
}
We can now start the application using the dotnet run command. Our site will be available at http://localhost:5000.
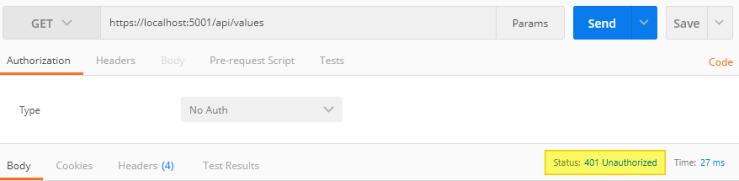
If we perform a GET request on https://localhost:5001/api/values, we will get a 401 UNAUTHORIZED error – as expected since we are not passing an access token:
Create the web application
To create the Angular web application, we can use the ng new command from the Angular CLI. The name of our app will be foo.web. I also added some additional parameters to scaffold a minimal project without any testing frameworks and without routing:
ng new foo.web --minimal=true --skipGit=true --routing=false --style=css
Now it is time to choose a library that supports OpenID Connect (OIDC) authentication. For this demo project, we will use the angular-oauth2-oidc npm module from Manfred Steyer. It is OpendID certified and has lot of handy features like automatically adding the access token to certain URLs when calling a Web API.
You can install the module using npm:
npm i angular-oauth2-oidc --save
Then we need to import the module inside the app.module.ts. I also configured the module to include the access token in the request when calling our Web API:
import { BrowserModule } from '@angular/platform-browser';
import { NgModule } from '@angular/core';
import { HttpClientModule } from '@angular/common/http';
import { OAuthModule } from 'angular-oauth2-oidc';
import { AppComponent } from './app.component';

@NgModule({
    declarations: [
        AppComponent
    ],
    imports: [
        BrowserModule,
        HttpClientModule,
        OAuthModule.forRoot({
            resourceServer:
            {
                allowedUrls: ['https://localhost:5001/api'],
                sendAccessToken: true
            }
        })
    ],
    providers: [],
    bootstrap: [AppComponent]
})
export class AppModule { }
To configure the library, we need to create a class that implements AuthConfig. We will do this in a new file called auth.config.ts:
import { AuthConfig } from 'angular-oauth2-oidc';
export const DiscoveryDocumentConfig = {
url: "https://aboutazure.b2clogin.com/aboutazure.onmicrosoft.com/v2.0/.well-known/openid-configuration?p=b2c_1_susi"
}
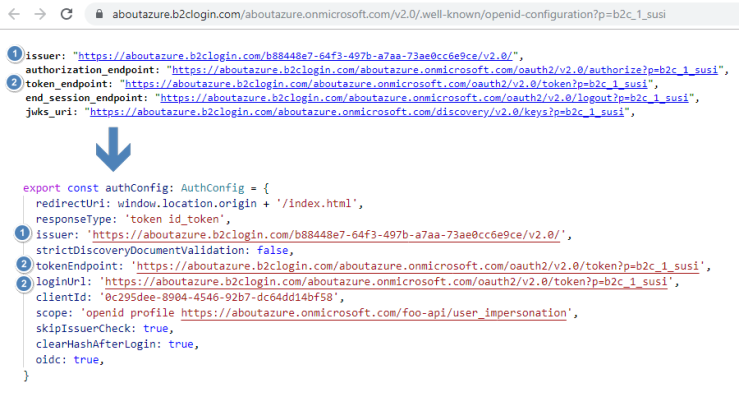
export const authConfig: AuthConfig = {
redirectUri: window.location.origin + '/index.html',
responseType: 'token id_token',
issuer: 'https://aboutazure.b2clogin.com/b88448e7-64f3-497b-a7aa-73ae0cc6e9ce/v2.0/',
strictDiscoveryDocumentValidation: false,
tokenEndpoint: 'https://aboutazure.b2clogin.com/aboutazure.onmicrosoft.com/oauth2/v2.0/token?p=b2c_1_susi',
loginUrl: 'https://aboutazure.b2clogin.com/aboutazure.onmicrosoft.com/oauth2/v2.0/token?p=b2c_1_susi',
clientId: '0c295dee-8904-4546-92b7-dc64dd14bf58',
scope: 'openid profile https://aboutazure.onmicrosoft.com/foo-api/user_impersonation',
skipIssuerCheck: true,
clearHashAfterLogin: true,
oidc: true,
}
We can get most of the values from the discovery document which is always located under:
https://{tenant}.b2clogin.com/{tenant}.onmicrosoft.com/v2.0/.well-known/openid-configuration?p={policy}.
Here is how the values are mapped:
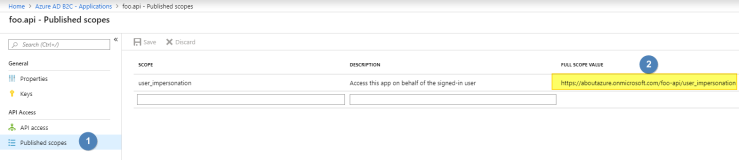
The clientId is the Application Id of our foo.web Azure AD application. The scope for our API can be found under Published scopes inside the Azure AD foo.api application:
Finally, to test the application, I modified the app.component.ts to list the claims for a logged in user and added a button to invoke our secured API and to Sign out.
Test the sign up and sign in
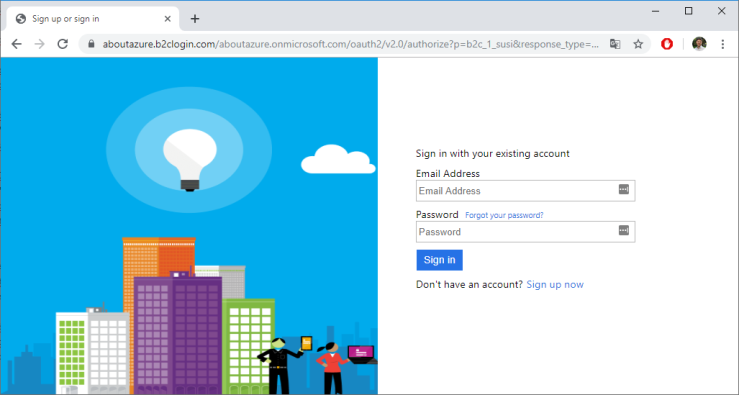
Now its time to test our application. This is how our web app looks like when we browse it:
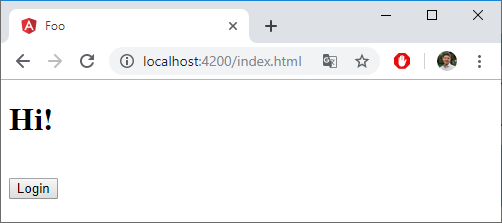
If we click on the Login button, we get redirected to our b2c_1_susi Azure AD B2C flow:
I already created an account. This is how the site looks like after I signed in with that account:
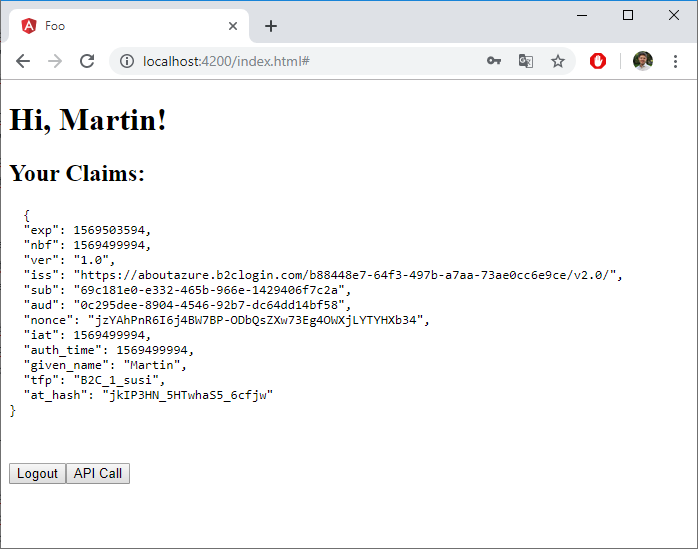
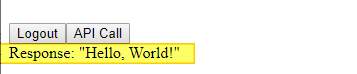
We can now invoke our secured foo.api service using the API Call button. We will see the response at the end of the page:
I published the whole source code in my GitHub repository. I also deployed both the web application and the API on Azure. You can test it live here.
Please note, that you inital have to create an account using the “Sign up now” link after you clicked on the Login button.
Update: I upgraded the source code on GitHub to .NET Core 3.1 and Angular 9
This is a great article, thanks a lot.
question.
– when you call the api, I don’t see a bearer token is explicitly added to html header. and the secured api call is still successful, what is the magic?
thanks.
Thank you! The bearer token is automatically added to the Header. You can see it in the Network Tab in the Browser:
https://imgur.com/a/0PyTfN0
Great work.. How did u manage refresh token logic? Also the access_token gets logged in browser history (could be security issue)
When the token will expire, how you will get new one without angular “back-end support”? According the OpenID Connect, you can’t use refresh token from client side as it should be securely kept.
I didn’t implement this in the demo but here is how it works: https://manfredsteyer.github.io/angular-oauth2-oidc/docs/additional-documentation/refreshing-a-token.html
I usually do not comment but just had to say what a great job you’ve done with the article, very clear and thorough!
The only changes I had to do to make it work for me was enable CORS on server for testing
and change the port for server written here (default for me was 44304).
Amazing time saver!!!
Thank you Ophir. Glad to hear that.
Hy Martin, I am creating a web app, where I provided a new functionality to user for “FREE TRIAL”, in normal free trial user need to provide basic info like name, email, password. I also provided a button for “Sign up with Azure Active Directory”, to implement this I created an app on Azure which is multi-tenanted (users from any directory can access my app), it is working fine but when I submitted this App to the Microsoft they respond this:
——————————————————————————————————–
Critical issues 1 failure(s)
These issues block the publish of your solution to Microsoft marketplace. Please refer to our Microsoft Marketplace policies for more details.
Acquisition, Pricing, and Terms
1000.3.1 AAD Single Sign-On
The app URL does not seem to provide a user experience of the app.
——————————————————————————————————–
Can you please help me, what I did wrong? Thanks
Sorry, you probably have to ask the Microsoft Support Team.
Thanks for the easy to follow article. I need to secure an Angular app, and I was wondering if there is a way to redirect unauthorized access to protected routes of my Angular app to the B2C flow’s login page? Can the DefaultOAuthInterceptor be used for this purpose, and if yes, how? Thanks in advance.
I think this should be possible but you should ask this question e. g. on Stackoverflow 😉
Hi this tutorial is looking great but I am stuck on the dotnet component. Being new to that bit the first mistake I made was using dotnet verison 3.0… Figured out how to use 2.1.607.
However when I run dotnet new and your values with obvious changes. I do not get a ValuesController.cs that is like yours (hello world change). When I try and get the 401 error I get a 502 and it seems to relate to certificates.
Perhaps this is my setup problem but could you specfically state what dotnet version you are using as it would be great to eliminate the scaffolding issue. As an FYI if you run dotnet new with version 3.0 it is totally different
Hi Matthew,
it was the last recent .net core (2.2) version available at the time I wrote the article.
Best regards,
Martin
Hi,
this.oauthService.getIdentityClaims() always returns null.
Have i missed any step. can you please help me out.
Thanks,
Prabhakar