

Using YAML (Yet Another Markup Language), we can manage our build definitions in a markup file. That file is under version control and is stored right next to our application. Once we set up a build pipeline using YAML, we can easily reuse it for similar applications.
In the past few years, I set up plenty of Angular related CI pipeline using the visual designer. In the future, I will reuse the following YAML.
In this article, we will create a .NET Core based Angular application from scratch, dockerize it, improve the build time and set up an Azure DevOps Continuous Integration (CI) pipeline to push the image to an Azure Container Registry (ACR).
Prerequisites
- GitHub Account
- GIT
- .NET Core
- Angular CLI
- Azure Container Registry
- Docker
Create a GitHub repository
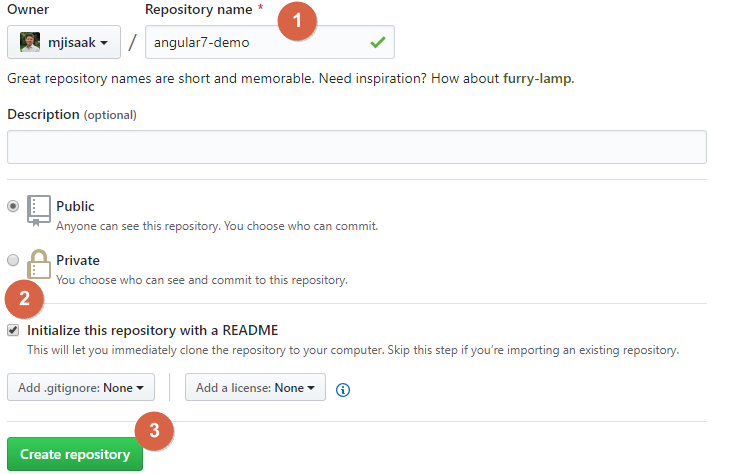
Before we create the Angular application we should create a git repository. In this example, we will use GitHub. To create the repository, simply go to https://github.com/new and fill out the form:
Now we can copy our new Git repository URL:
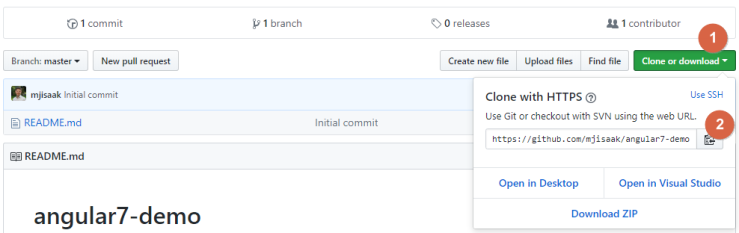
And clone the repository into a new local directory:
git clone https://github.com/mjisaak/angular7-demo.git
Create a new .NET Core Angular 7 application
Let’s start by creating a new .NET Core Angular project. To scaffold the project we can use the .NET Core command-line interface (CLI). The command we are looking for is dotnet new:
dotnet new angular -o dotnet-angular-sample
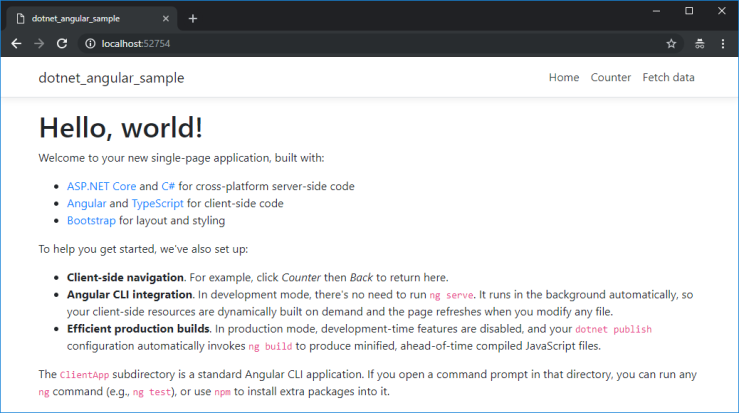
We can already run the application using dotnet run:
cd dotnet-angular-sample
dotnet run
This is how our application looks like:
Dockerize the application
To dockerize our application, we can use Visual Studio. Just right-click on your
project -> Add -> Docker Support and select Linux as the target OS. Visual Studio now modifies some project files and adds the following Dockerfile:
FROM microsoft/dotnet:2.2-aspnetcore-runtime AS base
WORKDIR /app
EXPOSE 80
EXPOSE 443

FROM microsoft/dotnet:2.2-sdk AS build
WORKDIR /src
COPY ["dotnet-angular-sample.csproj", ""]
RUN dotnet restore "/dotnet-angular-sample.csproj"
COPY . .
WORKDIR "/src/"
RUN dotnet build "dotnet-angular-sample.csproj" -c Release -o /app

FROM build AS publish
RUN dotnet publish "dotnet-angular-sample.csproj" -c Release -o /app

FROM base AS final
WORKDIR /app
COPY --from=publish /app .
ENTRYPOINT ["dotnet", "dotnet-angular-sample.dll"]
Now let’s try to build our container using docker build:
docker build -t dotnet-angular-sample .
You will recognize that the Visual Studio generated Dockerfile doesn’t work without some modifications. This is how the output looks like:
Sending build context to Docker daemon 298.2MB
Step 1/17 : FROM microsoft/dotnet:2.2-aspnetcore-runtime AS base
---> 78bd7dc97547
Step 2/17 : WORKDIR /app
---> Using cache
---> c7ceda9b2148
Step 3/17 : EXPOSE 80
---> Using cache
---> 38fdbd2738fe
Step 4/17 : EXPOSE 443
---> Using cache
---> a5a2df3e37f1
Step 5/17 : FROM microsoft/dotnet:2.2-sdk AS build
---> f9f28101464e
Step 6/17 : WORKDIR /src
---> Using cache
---> 41b8d8451a16
Step 7/17 : COPY ["dotnet-angular-sample.csproj", ""]
---> Using cache
---> d52a116a1594
Step 8/17 : RUN dotnet restore "/dotnet-angular-sample.csproj"
---> Running in c2664f3781f4
MSBUILD : error MSB1001: Unknown switch.
Switch: /dotnet-angular-sample.csproj
To solve this issue, we have to remove the trailing slash in line 9:
RUN dotnet restore "dotnet-angular-sample.csproj"
If you try to build the container again, you will get another error:
/bin/sh: 2: /tmp/tmp25863b70dbc5430fad00087c25e981ef.exec.cmd: npm: not found
/src/dotnet-angular-sample.csproj(43,5): error MSB3073: The command "npm install" exited with code 127.
This is because the microsoft/dotnet:2.2-sdk is missing the node and npm framework. To solve this issue we have to install these frameworks by adding the following snippet at line 7 to the Dockerfile:
RUN apt-get update -yq && apt-get upgrade -yq && apt-get install -yq curl git nano
RUN curl -sL https://deb.nodesource.com/setup_8.x | bash - && apt-get install -yq nodejs build-essential
RUN npm install -g npm
RUN npm install -g @angular/cli
Running the build again will now succeed. We can see our container using the docker images command:
![]()
To start the container we can use the docker run command:
docker run -p 8080:80 dotnet-angular-sampl
Our application should now be available under http://localhost:8080/
Speedup the docker build
Currently, each time we build our container it has to install the missing frameworks (node and npm) which is a time-consuming task. We can speed up our build by choosing a base image (for the build task) that already has the frameworks installed. I have created such a base image that is publicly available on hub.docker.com: mjibrandl/dotnetcore-angular. You can also check out the source code to build the base image on my GitHub repository.
Going back to our Dockerfile, we can remove the snippet we previously added to install node and npm and use the mjibrandl/dotnetcore-angular image instead. This is how our final Dockerfile looks like:
FROM microsoft/dotnet:2.2-aspnetcore-runtime AS base
WORKDIR /app
EXPOSE 80
EXPOSE 443

FROM mjibrandl/dotnetcore-angular:latest AS build
WORKDIR /src
COPY ["dotnet-angular-sample.csproj", ""]
RUN dotnet restore "dotnet-angular-sample.csproj"
COPY . .
WORKDIR "/src/"
RUN dotnet build "dotnet-angular-sample.csproj" -c Release -o /app

FROM build AS publish
RUN dotnet publish "dotnet-angular-sample.csproj" -c Release -o /app

FROM base AS final
WORKDIR /app
COPY --from=publish /app .
ENTRYPOINT ["dotnet", "dotnet-angular-sample.dll"]
Setup a CI build pipeline in Azure DevOps
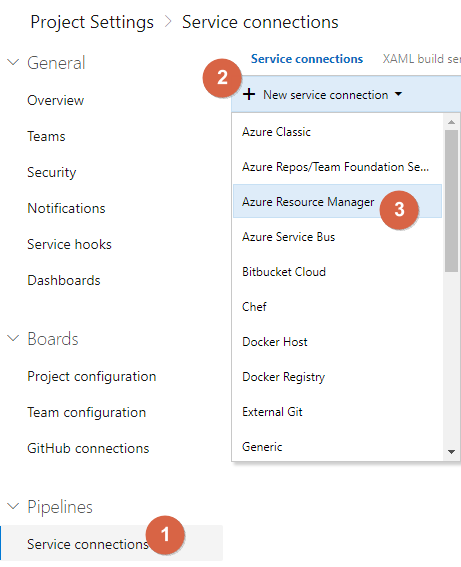
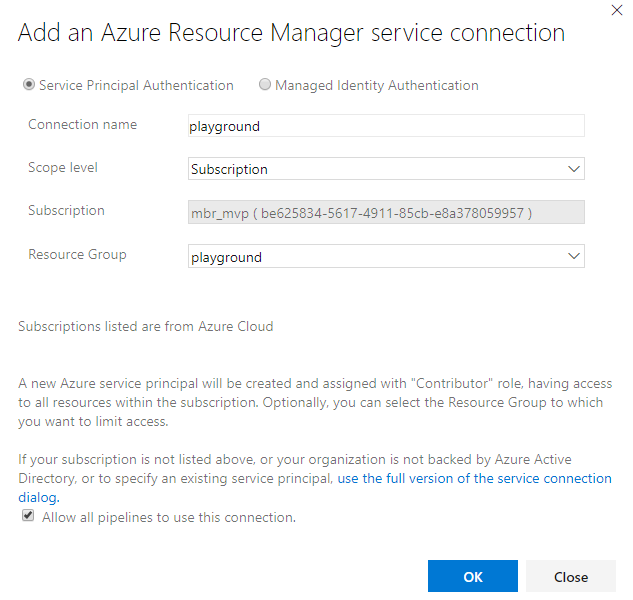
Before we can create our build pipeline, we need to establish a service connection to our Azure Container Registry. This can be done within the Azure DevOps Project settings -> Service connections -> +New service connection -> Azure Resource Manager:
Fill out the form by providing a name for the connection (we will need the name later in the YAML file). Choose the subscription and resource group where your Azure Container Registry is located:
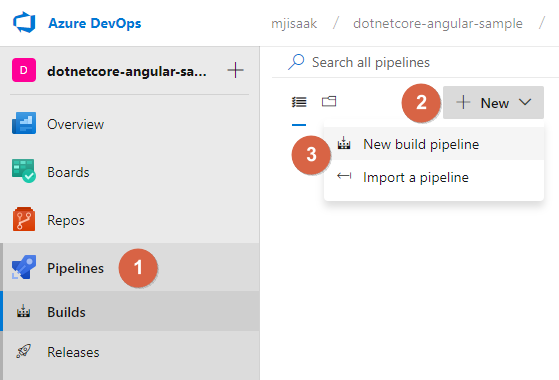
Now we can create the build pipeline. Go to Pipelines -> Builds -> New build pipeline:
In the following Connect dialog choose GitHub and select the repository you have created previously. In the Configure tab choose any template (we will overwrite it in the next step). Finally, we have to provide the YAML code to containerize our application and to push the image to our Azure Container Registry.
Adjust the variables in the below snippet and copy-paste it to the editor. You can choose an image name on line 7. On line 10 you have to specify the login server for your ACR and on line 11 use the name of the service connection that you have created:
trigger: none

pool:
  vmImage: 'Ubuntu-16.04'

variables:
  imageName: 'dotnetcore-angular-sample'
  imageTag: '$(build.buildId)'
  fullImageName: '$(imageName):$(imageTag)'
  containerRegistry: 'mjisaak.azurecr.io'
  serviceConnection: 'playground'

steps:
  - task: Docker@1
    displayName: 'Containerize the application'
    inputs:
    azureSubscriptionEndpoint: $(serviceConnection)
    azureContainerRegistry: $(containerRegistry)
    dockerFile: '**/Dockerfile'
    imageName: '$(fullImageName)'
    includeLatestTag: true

  - task: Docker@1
    displayName: 'Push image'
    inputs:
    azureSubscriptionEndpoint: $(serviceConnection)
    azureContainerRegistry: $(containerRegistry)
    command: 'Push an image'
    imageName: '$(fullImageName)'

  - task: Docker@1
    displayName: 'Push latest image'
    inputs:
    azureSubscriptionEndpoint: $(serviceConnection)
    azureContainerRegistry: $(containerRegistry)
    command: 'Push an image'
    imageName: '$(imageName):latest'
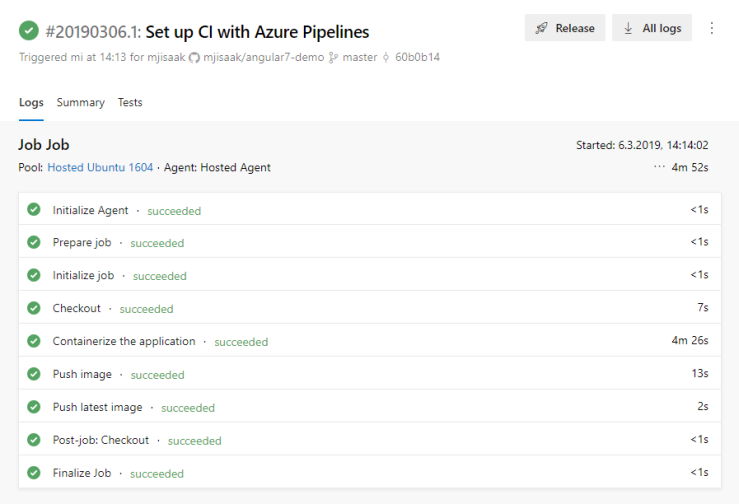
We can save the pipeline and start the build by clicking on the Save and run button on the top right. This is how the result should look like:
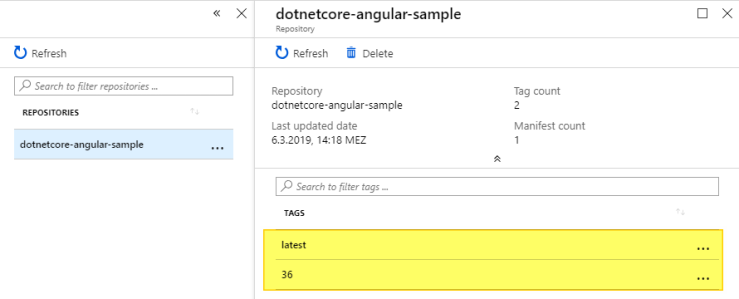
If the build succeeds, you should see two images in your Azure Container Registry:
Start the Azure Container Registry Image
To start our container we first have to log in to Azure Container Registry:
az acr login --name
Then we launch it using the docker run command we already used earlier:
docker run -p 8080:80 .azurecr.io/:latest
